Stop Excel changing your data, saving unwanted edits and more by turning off these defaults.
15 Excel Default Settings You Should Change to Work Faster
Hi ,
When you install Excel, it arrives with hundreds of decisions already made for you.
It decides how to interpret the data you type, how PivotTables should look, whether columns resize during a refresh, whether your edits should be saved automatically, and even what font appears in every new workbook.
Some of those defaults are helpful. Others can be frustrating, especially when you work with account codes, invoice numbers, reports, dashboards, and PivotTables.
The good news is you do not have to accept them.
In this guide, I'll share 15 Excel and Windows defaults you can change to make Excel behave the way you want.
One of Excel's most frustrating habits is changing perfectly valid data into something else.
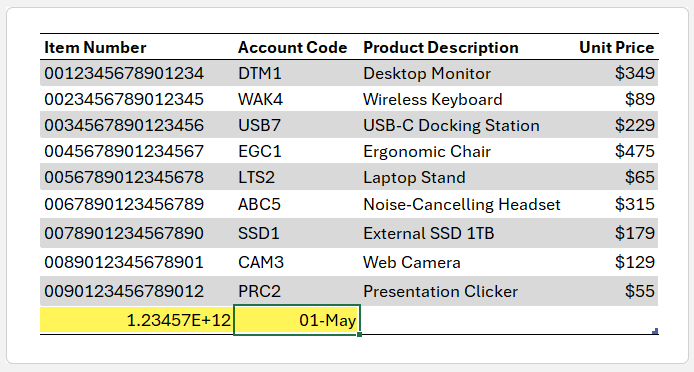
For example, you might type a long account number such as:
0001234567890123
Excel may remove the leading zeros, round the value after 15 digits, or display it in scientific notation.
Or you might enter a product code such as:
MAY1
Excel may decide it is a date and convert it to 1 May.
For years, the workaround was to format cells as Text before typing or start the entry with an apostrophe. Those methods still work, but newer versions of Excel allow you to stop some automatic conversions at the source.
How to stop Excel converting IDs, codes, and dates
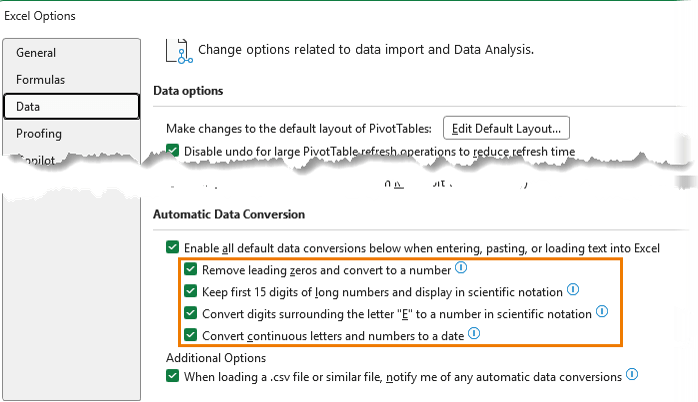
1. Go to File > Options > Data.
2. Scroll to the Automatic Data Conversion section.
3. Clear the settings you do not want Excel to apply automatically.
Useful options to turn off include:
• Remove leading zeros and convert to number format
• Keep first 15 digits of long numbers and display in scientific
notation
• Convert continuous letters and numbers to a date
• Convert digits around the letter E into a number in scientific notation
This setting is particularly useful for invoice numbers, employee IDs, account codes, barcodes, product codes, and other identifiers that may look like numbers but are not values you need to calculate with.
Keep in mind that Excel can only retain 15 digits of precision when a value is stored as a number. If you need to
retain all digits in a long identifier, it should be stored as text.
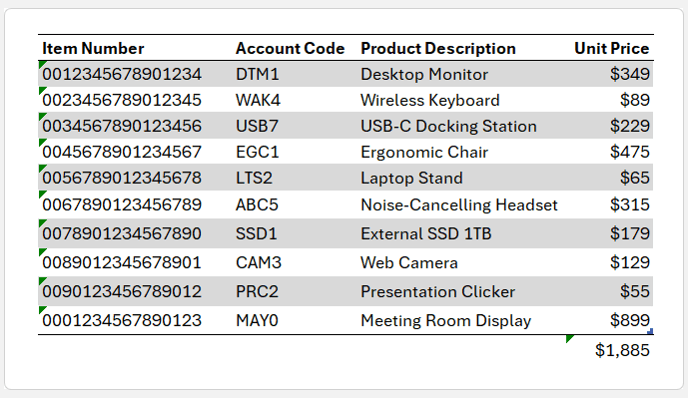
2. Turn off unnecessary green error triangles
The small green triangle in the top-left corner of a cell is Excel's way of telling you something may be wrong.
Sometimes it is useful. Excel may identify a formula that differs from nearby formulas or one that appears to omit adjacent cells.
But when you deliberately store invoice numbers or account codes as text, the warning that says Number Stored as Text is usually just visual noise.
How to control Excel error
warnings
1. Go to File > Options >
Formulas.
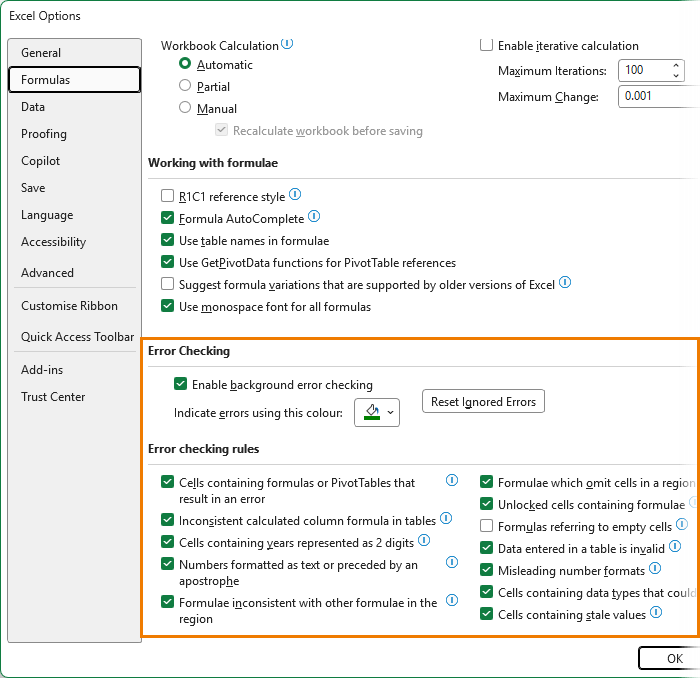
2. Scroll to the Error Checking Rules section.
3. Clear the individual rules you do not
need.
For example, you may want to untick:
• Numbers formatted as text or preceded by an apostrophe
I would avoid turning off all background error checking unless you are certain you do not need it. Formula warnings can catch genuine problems in reports and models, so it is usually better to turn off only the rules that do
not suit the way you work.
3. Change Excel's default font
If you have opened a new workbook recently and thought the font looked different, you are not imagining it.
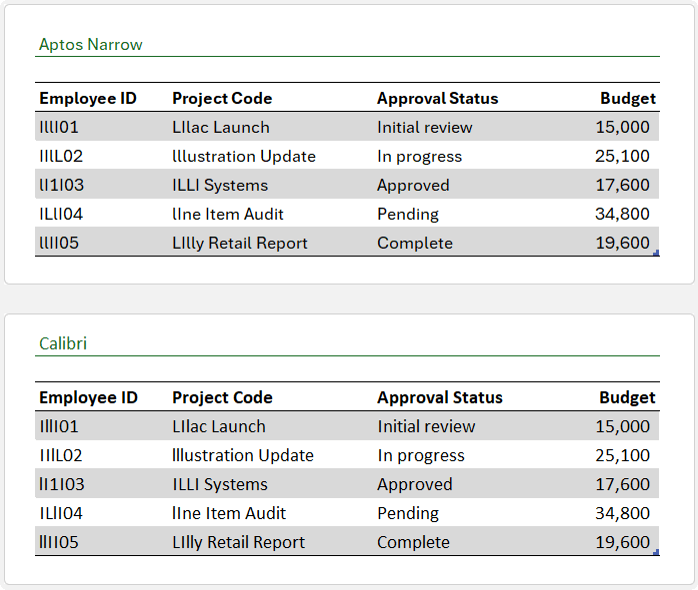
Microsoft replaced Calibri with the
Aptos font family in newer Office versions. Some users like it, while others find it less readable or simply prefer the familiar look of Calibri.
The good news is you are not stuck with it.
How to change the default font in Excel
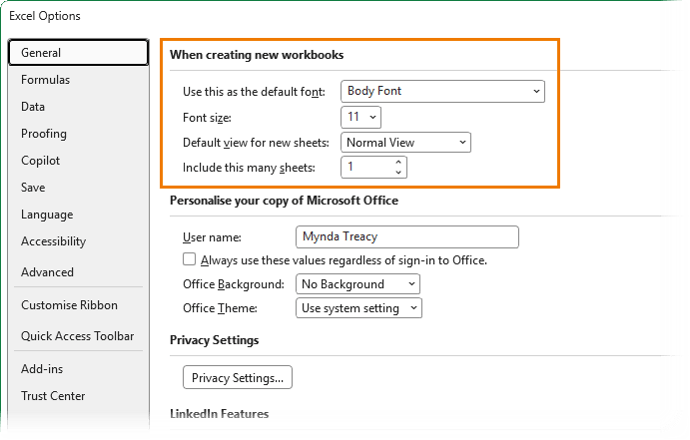
1. Go to File > Options > General.
2. Find the
When creating new workbooks section.
3. Select your preferred font under Use this as the default font.
4. Choose your preferred font size.
5. Click OK.
6. Restart Excel.
New workbooks will now use your chosen font and size.
Why copied worksheets may still use a different font
Changing the default font affects new workbooks. It does not necessarily change the theme used in an existing workbook.
If you copy a worksheet into another workbook and the font changes unexpectedly, the workbook theme is usually responsible.
To switch a workbook back
to the older Calibri-based Office theme:
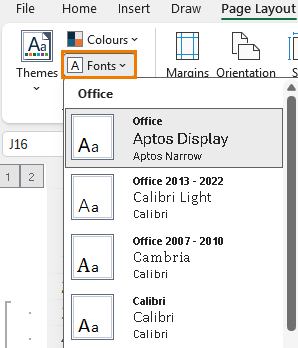
1. Go to the Page
Layout tab.
2. Click Fonts.
3. Choose Office 2013 to
2022.
This updates the font set across the workbook, including charts.
4. Remove gridlines from reports and dashboards
Gridlines are useful when you are entering data or building a worksheet.
They are less useful in a finished report, executive summary, or dashboard. In those situations, gridlines can make a polished report look unfinished.
How to hide gridlines in Excel
1. Go to the View tab.
2. Untick Gridlines.
This is best used selectively.
Keep gridlines on for data-entry sheets where people need visual guidance. Turn them off on dashboard and summary sheets where presentation matters
more.
You can also add a subtle custom background via Page Layout > Background to give a dashboard or report a more polished look.
5. Switch off table names in formulas
Excel Tables use structured references, which look like this:
=SUM(Sales[Profit])
Instead of this:
=SUM(L9:L30)
Structured references automatically expand as your table grows and can make formulas easier to read, especially in larger workbooks.
However, some people find them distracting, particularly when learning formulas or teaching Excel beginners.
How to use normal cell references instead of table names
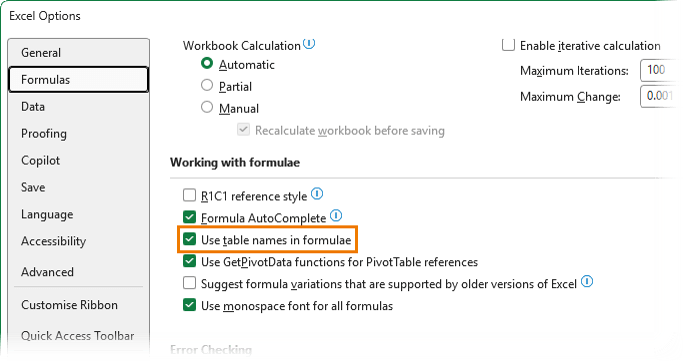
1. Go to File > Options > Formulas.
2. Under Working with formulas, untick Use table names in formulas.
Excel will then use regular A1-style references when you select cells or table columns in formulas.
Before switching this setting off, consider whether structured references may actually help you. A formula such as:
=SUM(Sales[Profit])
can be easier to audit than
=SUM(L9:L30)
especially when worksheet layouts change.
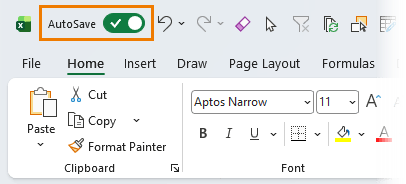
6. Make AutoSave off by default
AutoSave is useful when you are collaborating on files stored in OneDrive or SharePoint.
But it can be risky when you
open a finished report, make temporary changes to test an idea, and then close the workbook. With AutoSave enabled, those test edits may already have been saved to the original file.
How to turn off AutoSave by default
1. Go to File > Options > Save.
2. Untick AutoSave OneDrive and SharePoint Online files by default on Excel.
3. Restart Excel.
You can still turn AutoSave on for individual files when you want real-time saving and
collaboration.
For important reports, a good habit is to save a copy before experimenting. AutoSave is useful, but it is not a replacement for sensible file naming and version control.
7. Set your preferred PivotTable layout as the default
Every time you create a PivotTable, Excel applies its standard layout.
For many users, that means immediately changing the report layout to Tabular Form, moving subtotals, changing grand total settings, and cleaning up the design.
You can set your preferred PivotTable layout once and use it for every new PivotTable.
How to set default PivotTable options
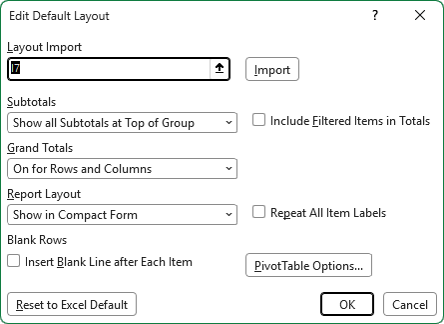
1. Go to File > Options > Data.
2. Under PivotTable Layout, click Edit Default Layout.
3. Set your preferences for: • Report layout • Subtotals • Grand totals • Blank rows • Formatting
4. Click OK.
This applies to new PivotTables, not existing ones.
8. Stop PivotTables resizing your columns after refresh
You carefully set your column widths. Your dashboard looks tidy. Then you
refresh a PivotTable and Excel changes everything.
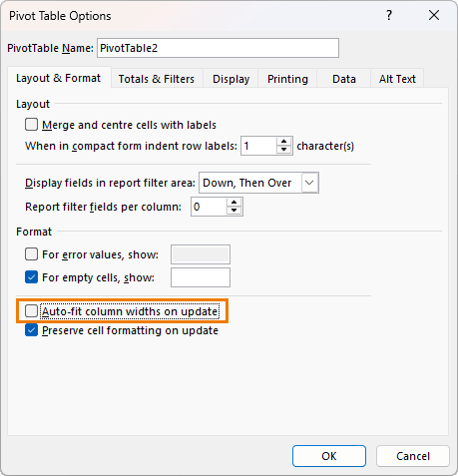
This happens because of the Autofit column widths on update setting.
How to stop PivotTable columns resizing
1. Right-click inside the PivotTable.
2. Select PivotTable Options.
3. Open the Layout & Format tab.
4. Untick Autofit column widths on update.
5. Consider ticking Preserve cell formatting on update as well.
6. Click OK.
This is especially useful in dashboards, print-ready reports, and worksheets where multiple
PivotTables need to line up neatly.
9. Stop PivotTables grouping dates automatically
When you add a date field to a PivotTable, Excel often groups the dates into Years, Quarters, and Months automatically.
That can be useful, but it is frustrating when you want to see the actual individual dates.
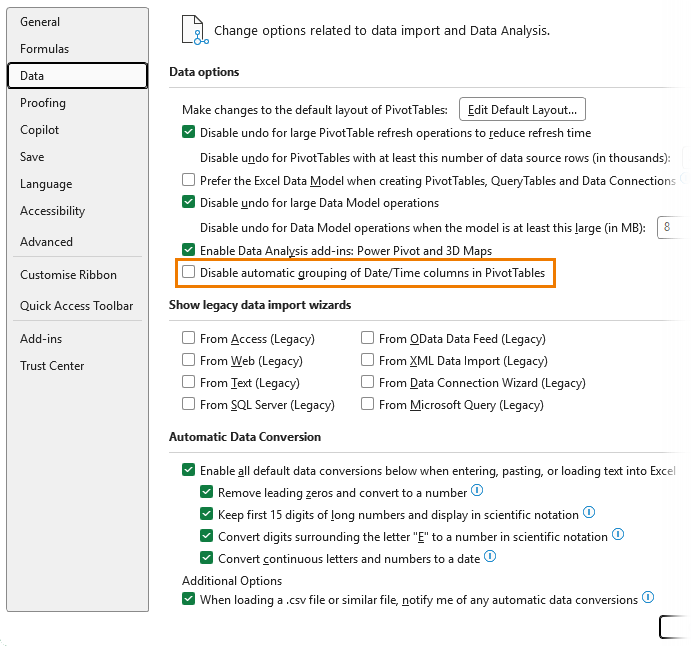
You can press Ctrl+Z immediately after adding the date field to undo the grouping. But if you never want Excel to group dates automatically, you can turn off the behaviour permanently.
How to disable automatic
date grouping in PivotTables
1. Go to File > Options >
Data.
2. Under Data Options, tick: • Disable automatic grouping of Date/Time columns in PivotTables
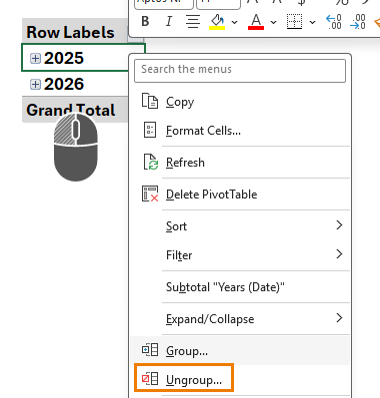
Existing PivotTables will still need to be ungrouped manually.
To do that, right-click a grouped date field and choose Ungroup.
10. Use the Office Clipboard instead of copying one item at a time
Most people copy one thing, paste it, then copy the next thing.
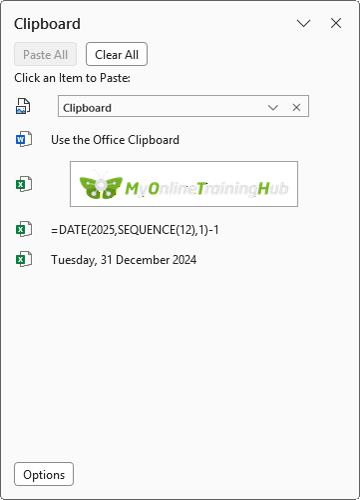
The Office Clipboard lets you collect multiple copied items and paste them when you need them.
This is useful when you are building a long formula, combining text from different emails, copying labels from a report, or moving content between Excel, Word, Outlook, and your browser.
How to open the Office Clipboard
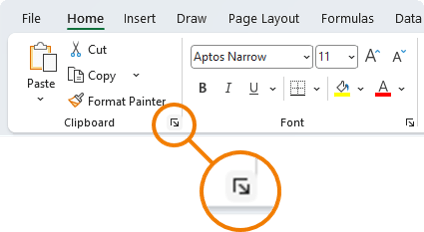
1. Go to the Home tab.
2. Click the small launcher arrow in the bottom-right corner of the Clipboard group.
The Office Clipboard can store up to 24 copied or cut items.
You can then choose which item to paste and in what order.
11. Open Excel directly to a blank workbook
When you open
Excel, it normally displays the Start screen with templates and recent files.
That may be useful for some people. But if you nearly always want a blank workbook, it adds an unnecessary click.
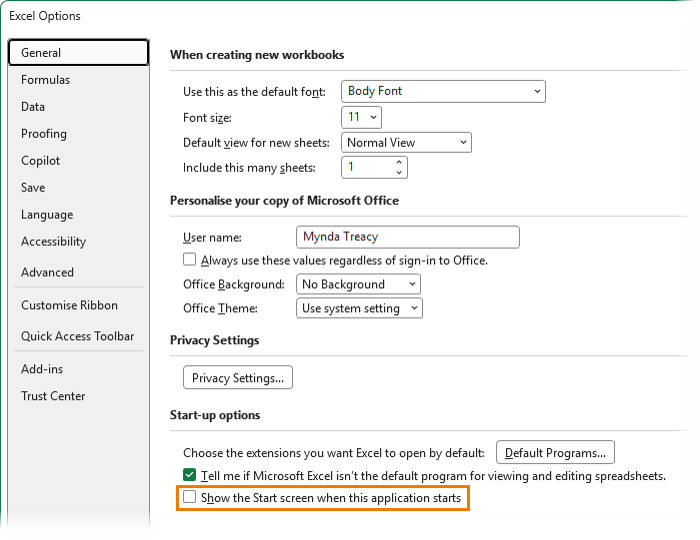
How to skip the Excel Start screen
1. Go to File > Options > General.
2. Scroll to Start up options.
3. Untick Show the Start screen when this application starts.
4. Click OK.
Excel will then open directly to a fresh blank workbook.
12. Stop Office files opening in the browser
If you download an Excel file and it opens in Excel for the web rather than the desktop application, you may not have access to every feature you need.
This is especially relevant for workbooks that use advanced formulas, Power Query, VBA, Power Pivot, external connections, or other desktop-only features.
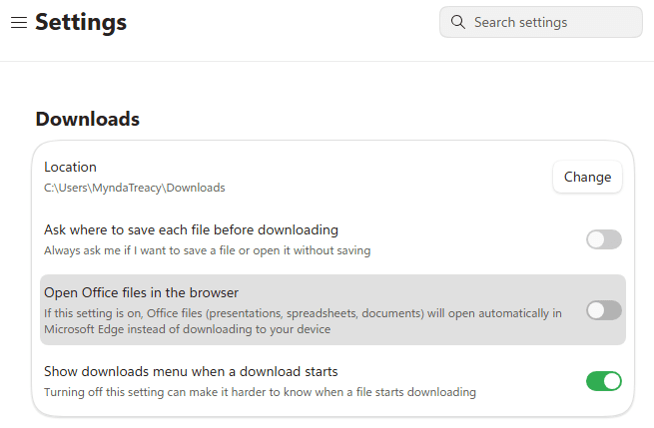
How to stop Edge opening downloaded Office files in the browser
1. Open Microsoft Edge.
2. Click the three dots in the top-right corner.
3. Select Settings.
4. Select Downloads.
5. Turn off Open Office files in the
browser, where that setting appears.
This allows downloaded Excel, Word, and PowerPoint files to open in the desktop applications instead.
13. Turn off Copilot formula
suggestions
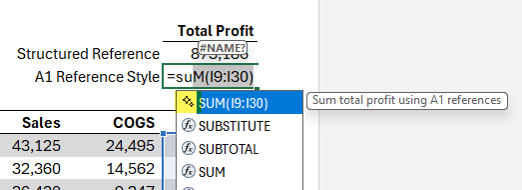
Some Microsoft 365 users now see Copilot suggestions while writing formulas.
For beginners, this may be helpful. For experienced Excel users, though, it can be distracting and slow formula entry, while using additional AI processing and energy for suggestions they do not need.
This setting is separate from normal Formula AutoComplete, which suggests
Excel functions and named ranges as you type. Formula AutoComplete is often useful and does not need to be turned off just because you do not want Copilot suggestions.
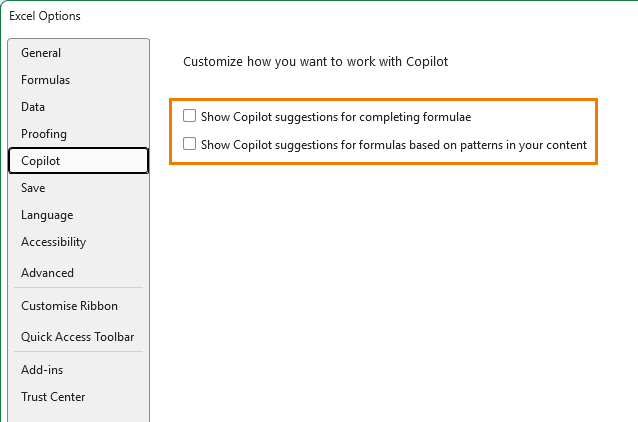
How to turn off Copilot formula suggestions
1. Go to File > Options > Copilot.
2. Turn off options such as: • Show Copilot suggestions for completing formulas • Show Copilot suggestions for formulas based on patterns in your content
These settings will only appear in eligible Microsoft 365 versions with Copilot features enabled.
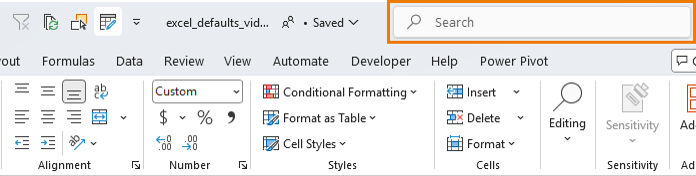
14. Make the Microsoft Search box smaller
The large Search box at the top of Excel can take up a lot of space, particularly on smaller screens.
It can also crowd the workbook name, which is not ideal when you work with multiple versions of the same file.
How to collapse the Excel Search box
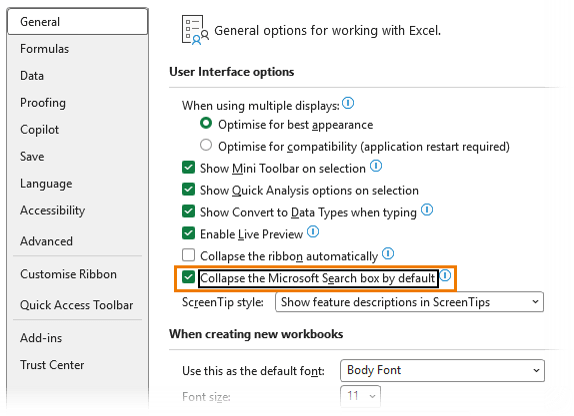
1. Go to File > Options > General.
2. Tick Collapse the Microsoft Search box by default.
3. Click OK.
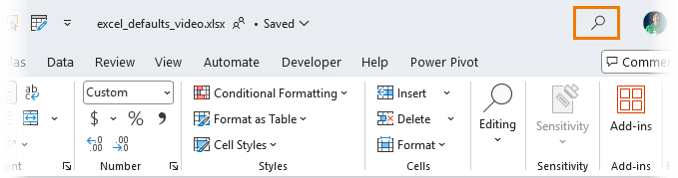
The large Search box is replaced by a small magnifying glass icon, giving the workbook name more room in the title bar.
15. Show file extensions in Windows File Explorer
This last setting is not strictly an Excel setting, but it is useful for anyone who works with files regularly.
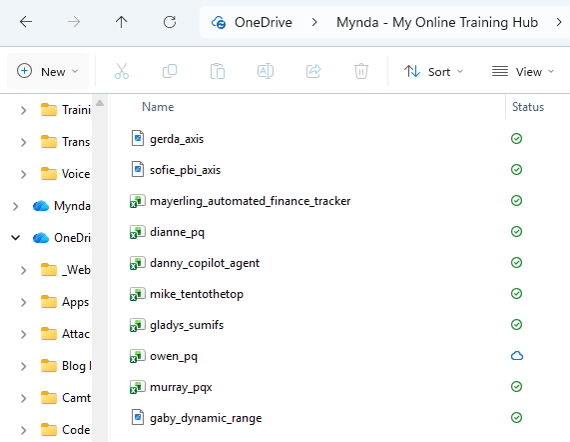
When file extensions are hidden, it is harder to scan a folder quickly and identify whether a file is an .xlsx, .csv, .xlsm, .pdf, or something
else.
Showing extensions also makes it easier to spot suspicious files. It is not a complete security measure, but it gives you more information before opening an attachment or download.
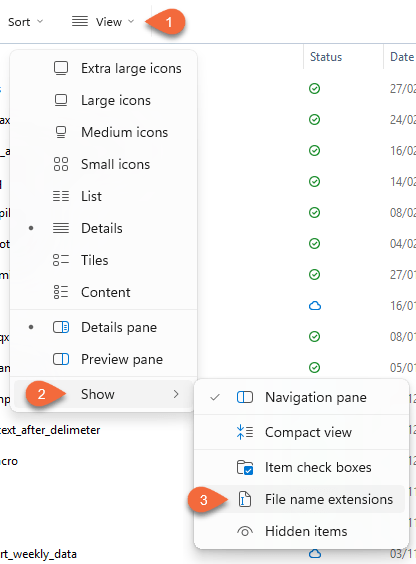
How to show file extensions in Windows 11
1. Open File Explorer.
2. Select View.
3. Select Show.
4. Tick File name
extensions.
You will now see the full file name, including its extension.
Make Excel work the way you work
Excel defaults are
designed for millions of users with different needs.
That means many of its settings will not suit the way you work with reports, dashboards, codes, PivotTables, and important business files.
Start with the settings that cause you the most frustration:
• Stop Excel converting your data
• Set your preferred PivotTable
layout
• Prevent PivotTable columns from resizing
• Choose a font you actually like
• Turn off unnecessary error warnings
• Decide when AutoSave should be enabled
A few small changes can
remove repetitive steps, protect your data, and make every new workbook feel more like your own.
Download the free cheat sheet for the full list of menu paths, then save it somewhere you can refer back to whenever Excel starts getting in your way.
Turning off the annoying stuff is only half the story. The other half is learning the small Excel tricks that make you faster, more
accurate, and more confident every day.
Want to sponsor our newsletters? Just reply to this email to get in touch with
us.
Excel Dashboards
Dashboards provide insight, analysis and alerts by displaying key trends, comparisons and data in interactive reports. Filter data and change views to find the answers you need.
Microsoft’s leading business intelligence tool enables you to quickly develop stunning interactive dashboards. Embed Excel charts, Pivot Tables and data, then securely share to any device.
Ready to go beyond spreadsheets and start solving real business problems? Whether transitioning into data analysis or levelling up in your current role, this Excel Fast Track is your launchpad.
Automate repetitive tasks and build powerful Excel applications with Macros and VBA. Record macros, write VBA code, create custom functions and build user
forms — no prior programming experience required.
Get quickly up to speed with Excel’s functions. Covers the fundamentals for each
function and less-obvious advanced uses. The techniques that will really set you apart from the crowd.
Make huge efficiency gains using dynamic named ranges that automatically update formulas, Pivot
Tables and charts. Automate banded formatting, sorting, filtering and totals — all in under 1 hour.
Quickly build your own Pivot Tables with confidence. Covers ideal data layout,
formatting, aggregation, pivot charts, filters, slicers and much more — in the shortest time possible.
Automate the laborious task of gathering and cleaning data from almost any source. Load data into
Excel, Power Pivot or Power BI for analysis, report preparation or export.
Import millions of rows of data, create relationships between different data sources, and build
interactive reports. Transform huge volumes of data into meaningful information fast.
From zero to hero — confidently list ‘Advanced Excel Skills’ on your resume. Covers best workbook
design, advanced formulas, pivot tables, conditional formatting, macros and much more.
Supercharge your workflow with AI across Word, Excel, PowerPoint, Outlook and Teams. No tech
jargon — just practical skills that make your daily work easier, faster and smarter.
Quickly summarise and analyse large amounts of data with just a few clicks. Transform data
into meaningful information and create reports that are easy to update and change.
Choose one or any combination of the three. Learn the core Office tools every
professional needs — covering the skills that matter most in a modern workplace environment.
This email may contain affiliate links. This means I may earn a commission should you choose to make a purchase using my link. But we only promote courses we believe will benefit you.