Step 1: Design the Header Layout
Open a new Excel file and save it as a .xlsm Macro Enabled Workbook. Then set up the invoice header area. Mine looks like this, but you can modify it to suit your needs:
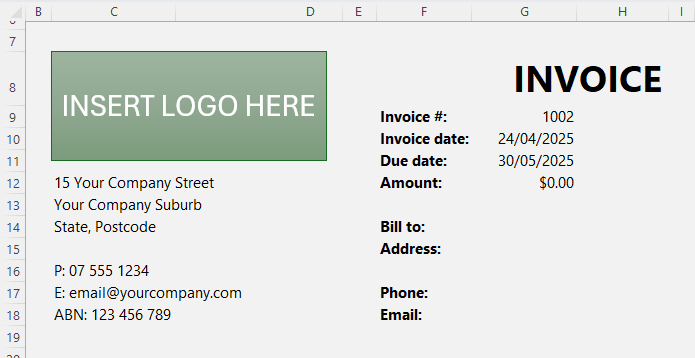
For a clean design:
- Shade the invoice cells B3:I77 a
pale grey (don’t do this if you print your invoices).
- In cell H8, enter “INVOICE” with a bold 28pt font.
- Add a logo in the top left.
- Insert company info in C12:C17 (e.g., address, email, tax identifiers).
- Add invoice
details in F9:F18 including:
- Invoice #: Cell G9 → Start at 1000 or 10000 (or your next number)
- Invoice Date: =TODAY()
- Due Date: Use a formula to calculate. E.g. net 30 days: =G10+30 or net 30 EOM: =EOMONTH(G10,0)+30
- Amount: This will be linked later.
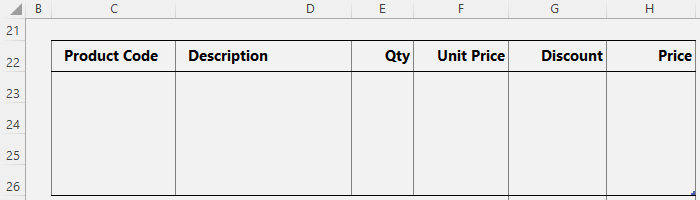
Step 2: Build the Invoice Table
Create a table for itemised entries:
- Start in cell C22 with headers: Product Code, Description, Qty, Unit Price, Discount, Price (modify to suit your needs as
required).
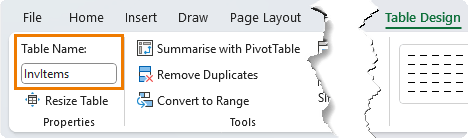
- Select the headers and press Ctrl + T to format as a table
- Name the table (Table Design tab): InvItems
- Set formatting:
- Currency format for Unit Price and Price
- Percentage for Discount
- Custom number format on Price column to hide zeros: $#,##0.00;-$#,##0.00;
Price Formula
In the Price column, use:
=ROUND([@Qty]*[@[Unit Price]]*(1-[@Discount]), 2)
Step 3: Calculate Totals
Below the table (e.g., cells G27:G30), insert:
- Subtotal: =SUM(InvItems[Price])
- Tax Rate: Enter 10%
- Tax Amount: =ROUND(H27*H28,2)
- Total:
Subtotal + Tax Amount (=H27+H29)
- Format totals with borders and centred text.

Then, define a name for the Total cell (e.g., Total) and link G12 (Amount) to it: =Total
Step 4: Add Notes and Bank Details
- Add a Notes section in cell C33
- Add Bank Details starting at cell C37
This includes bank name, account number, etc. required for your customer to pay you.
Step 5: Set the Print Area
Select B3:I45 (or the relevant cells for your invoice area) and go to:
Page Layout tab > Print Area > Set Print Area
Adjust page setup:
- On the Page tab > Fit to 1 page wide x 1 page tall
- On the Margins tab > Center horizontally & vertically
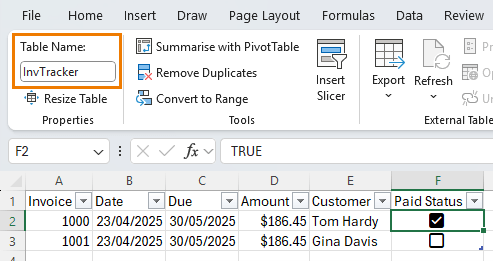
Step 6: Create the Invoice Tracker
Add a new sheet and rename it Tracker. Insert headers - these are the fields from the Invoice that you want to record. Modify as required:
- Invoice, Date, Due, Amount, Customer from the invoice and an additional column to track the Paid Status
Format as a table (Ctrl + T) and name it InvTracker.
Insert a check box in the Paid Status column.
Step 7: Write the Record
Invoice Macro
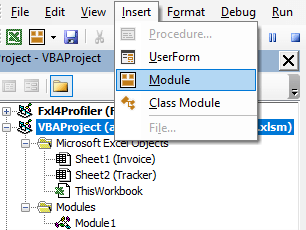
Enable the Developer tab (right-click Ribbon > Customize > check the box for the Developer tab), open the Visual Basic Editor:

In the Visual Basic Editor, select the Automated Invoice Excel file and via the Insert menu > insert a new module:
In the module, enter this macro to copy the data from the Invoice template to the Invoice Tracker:


