Hi ,
If you receive your data in separate daily, weekly or monthly files then before you can even begin analyzing the data, you need to consolidate it into one table.
In the past we may
have written a Macro to automate this process, but if you didn’t have Macro/VBA skills then you were stuck doing it manually.
Nowadays we can automate this process with Power Query, and the best part is you don’t have to be a programmer to use it because there is a nice ribbon interface, so it’s point and click. And when you get the next period’s file, you simply refresh Power Query and it grabs the new data and adds it to the
consolidated table for you.
Once we’ve consolidated our files with Power Query we can then load the data into an Excel worksheet, or the Power Pivot data model in Excel or Power BI.
Watch the Video

Power Query Get Files from a Folder - The Data
In the folder below, you can see I have 7 CSV files (tip: you can also get Excel files and Text files from a folder):
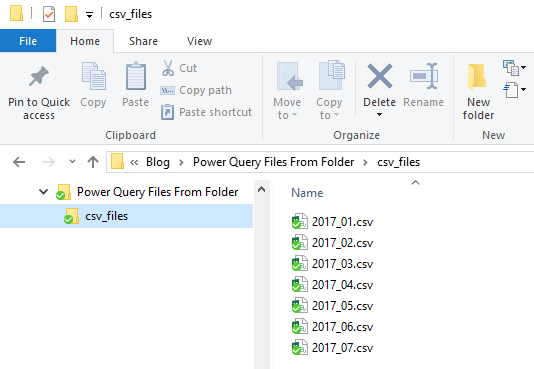
Important Point: The folder should only contain files that you want to consolidate. That said, you can pick and choose the files you want to import, it’s just safer and cleaner to keep the folder dedicated to your source data files. Trust me.
In this example each CSV file contains 3 columns of data, as you can see below in the January 2017 file:
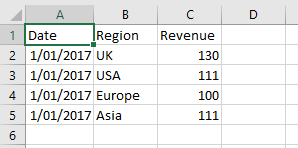
Important Point: My files have 3 columns of data, but you can import more. However, each file must contain the same number of columns, with the same names, although they don't need to be in
the same order. If your data is an export from another system, then this should be the case anyway.
Power Query Get Files from a Folder – Excel Steps
The Power Query location is slightly different in earlier versions of Excel. I’ll point out menu differences where relevant but be prepared for them to change in the future because Microsoft are renowned for redesigning menus!
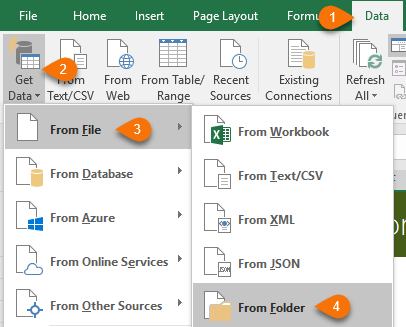
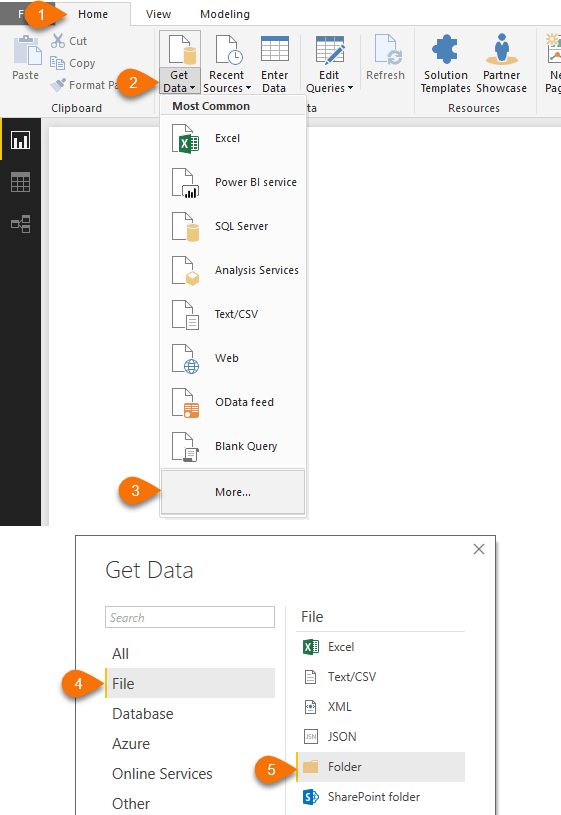
Step 1: Create a New Query.
Excel 2016 onward: Data tab of the ribbon > Get Data > From File > From Folder:
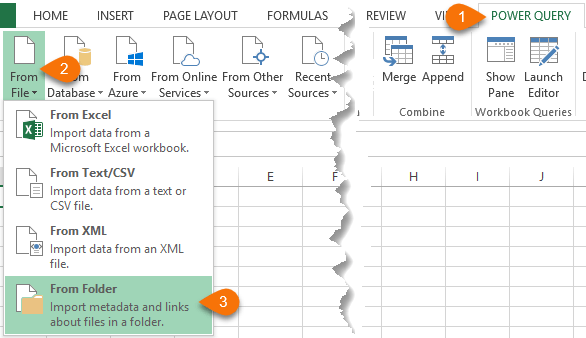
Excel 2010/2013: Power Query tab of the ribbon > From File > From Folder:
Power BI Desktop: Home tab of the ribbon > Get Data > More > File > Folder:
Note: From here on the process is the same in all versions of Excel & Power BI.
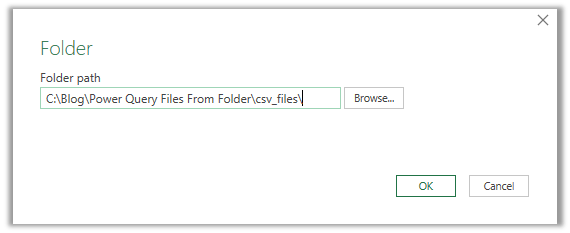
Step 2: Specify the Folder
In the ‘Folder’ dialog box browse to your folder location, or paste it in and
click OK (in later versions of Excel you will be taken directly to the Browse Files dialog):
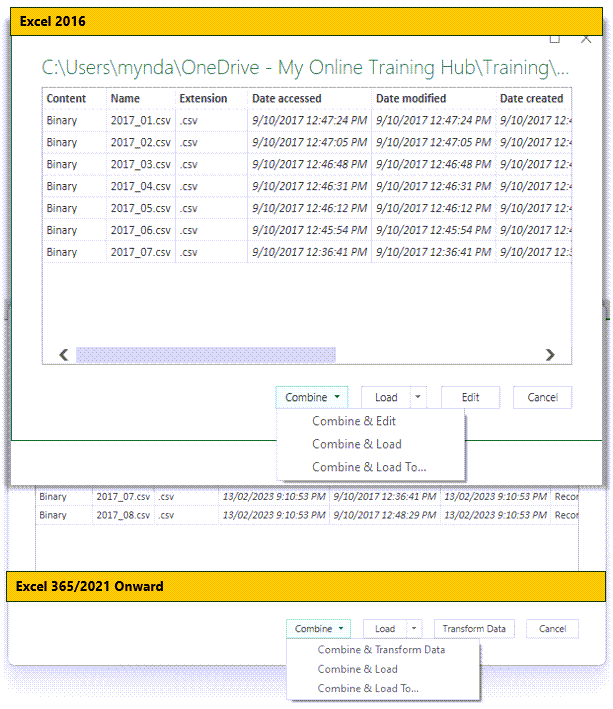
Step 3: Select Files
At the next dialog box you’ll see a list of the files in the folder. At this stage you can choose to Load right away, or Combine & Edit/Transform, Combine & Load, or Combine & Load to... (which allows you to specify where you want the data loaded).
I always choose 'Transform Data' aka ‘Edit’ in Excel 2016 and earlier. This way I can filter out any files I don't want to include before combining.
I also like to edit my query to make sure the data types have been set correctly, plus it gives me an opportunity to clean the data or add additional columns, and give the query a sensible name before loading it:
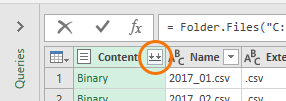
Step 4: Expand Content
Clicking Transform Data/Edit in step 3 launches the Power Query Editor window and displays a list of the items in the folder:
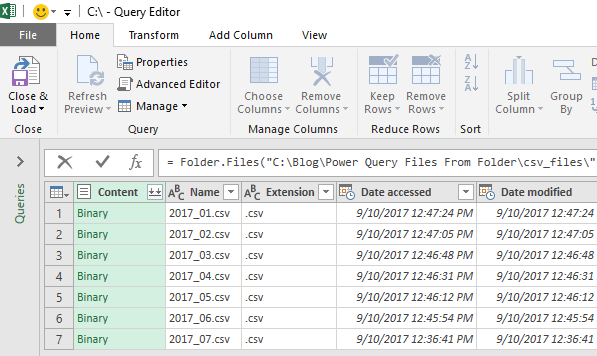
Tip: Notice there are some columns included in this view that you might want to make use of. More on that another time.
In this
window you can filter out any files you don’t need. I want them all so I’ll click the double down arrow on the Content column to extract the data from each of the CSV files:
Step 5: Select Settings
Clicking the double down arrow on the Content column will launch the Combine Files dialog box where you can see a preview of the data and:
- Specify which file you want Power Query to use as the example file.
- Choose the File Origin; this helps Power Query understand what format the dates and currency values will be in etc.
- Choose the Delimiter
- And
whether the first 200 rows will be an adequate sample size
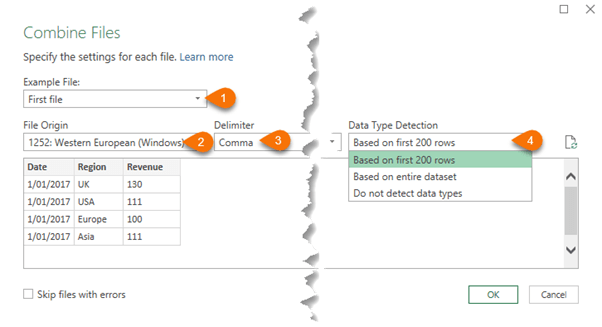
Once you’re happy with the settings, go ahead and click OK
Step 6: Combine Files
Power Query gets the data from the files you selected in step 4 and consolidates them into one table:
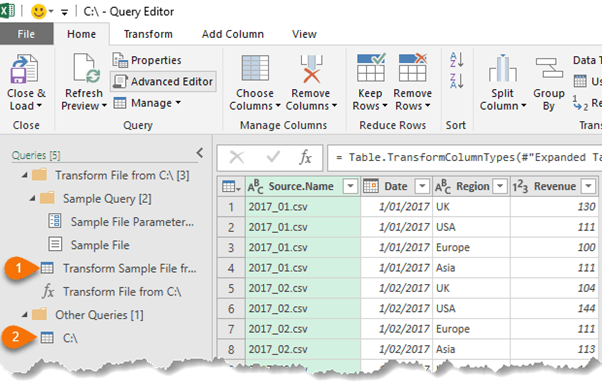
On the left (image above) is a list of queries that were automatically generated by Power Query when you clicked the Ok button in step 5. There are two items in this list that are important to you:
- This is the sample file query. It’s this query that Power Query uses as a template for consolidating all of the files into the final query. This is the query to modify with any changes you want applied to all of the files in the folder.
For example, unpivoting tables should be done in the Sample File query because you need to do this before combining them.
- This is the final query that consolidates the files into one table. This is the query currently displayed in the preview. Modify this query with any final changes or additional columns you want to add etc. prior to loading the data into a worksheet or the Power Pivot data model. E.g. you might want to delete the Source.Name
column if you don’t need it, plus it’s always a good idea to make sure the data types for the columns are correct.
On the right-hand side of the Query Editor window (image below) you’ll see the Query settings for the selected query:
- I recommend you replace the default query name to something more useful. Just type it in the Name field and press ENTER. I’ll call mine ‘consolidated_data’.
- This is a list of the steps that have been
applied to the data to reach the point you see in the preview.

Step 7: Load Data
When you’re
happy with the data in the final query you can load the data.
Power BI Desktop: Home tab > Close & Apply:
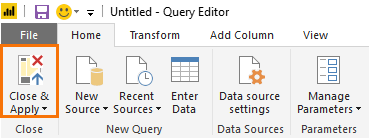
This will add the data to the Power BI Data Model (Power Pivot).
In Excel: Home tab > Close & Load:
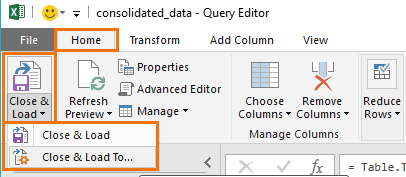
Close & Load will load the data to the default location, which is usually an Excel Table in a new worksheet in the Excel file containing the query.
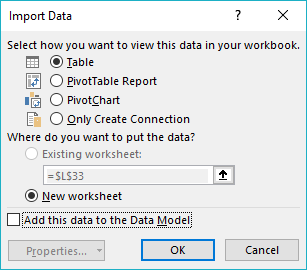
If you want to choose a different location or load it to the Power Pivot data model then choose ‘Close & Load To…’. This opens the Import Data dialog box (image below) with the defaults selected, which you can edit:
I’ll click OK and you can see the data has been inserted into a new sheet; ‘Sheet1’ and formatted in an Excel table ready for me to use:
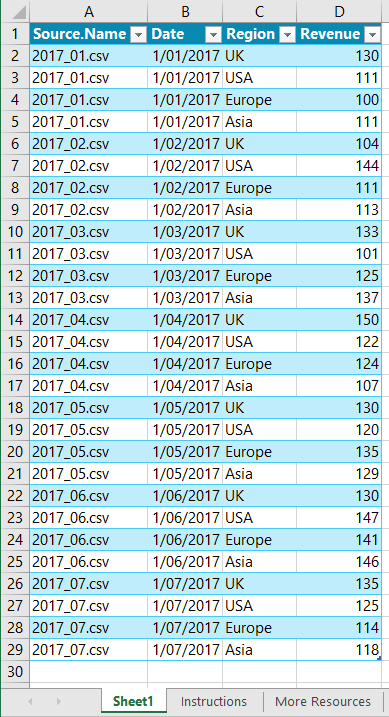
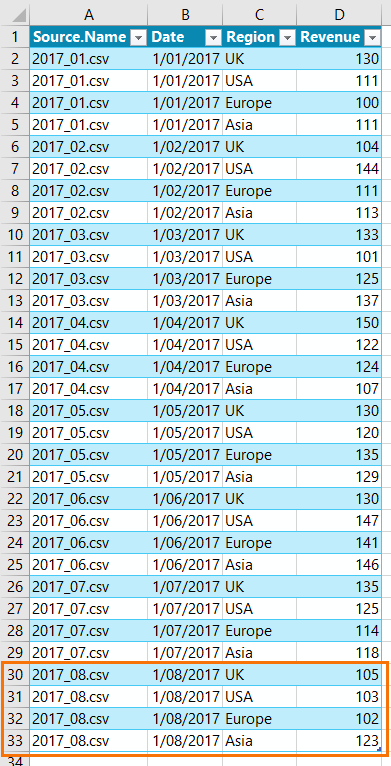
Notice that the data goes up to July 2017.
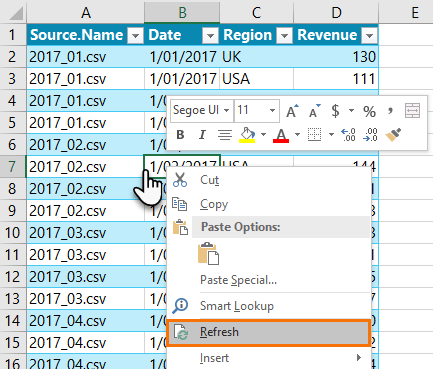
Updating the Query with New Data
As you can see in the image
above, the data we currently have is for the period January to July 2017. When August’s CSV file gets added to the folder:

Simply right-click
any cell in the Table > Refresh:
Power Query goes to the folder, gets the new file (actually it gets all files again), runs them through
the steps you set up to clean and transform the data and then loads the updated Table:
I know, it sounds too easy, but honestly that’s all
you need to do.
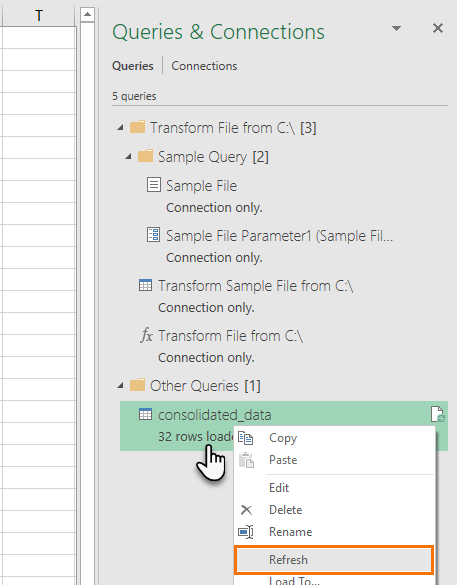
Note: If your data has been loaded to the Power Pivot data model then you can also right-click the query in the Queries & Connections pane in the right-hand side of your Excel window > Refresh (if the Queries & Connections pane isn’t visible you can enable it on the Data tab of the Ribbon):
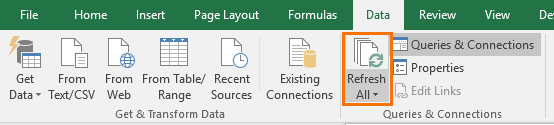
Or click the Refresh All button on the Data tab of the ribbon (note; this will refresh everything!):
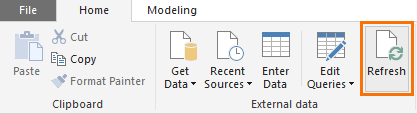
In Power BI Desktop the Refresh button is on the Home tab:
More Power Query
More Power Query tutorials on our Blog.
And if you want to get up to speed quickly, please check out my Power Query course and Power BI Course.
Get help with Power Query questions on our Excel Forum.
Have a great day,
Mynda Treacy
Co-founder My Online Training Hub


 Check Out Our Courses