Download
the Workbook
The workbook contains the examples in the post. Use it as a reference guide or share it with co-workers.
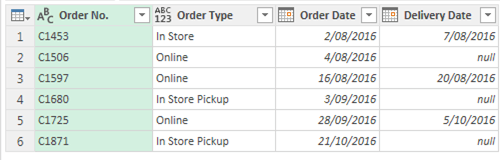
Ok, let’s look at an example; below we have some Orders data in Power Query.
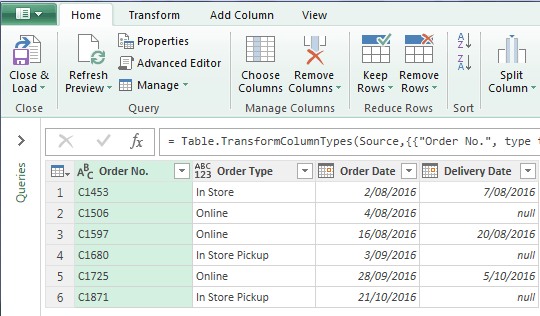
We want to add a ‘Delivery Status’ column to indicate whether the order has been delivered.
The logic in English is, if the delivery date column is not blank, then the order has been Completed.
On the Add Column tab of the ribbon click Conditional Column. The dialog box opens (see below) with an easy point and click menu to help you build the ‘if’ statement (note: ‘null’ in Power Query
means blank or empty):
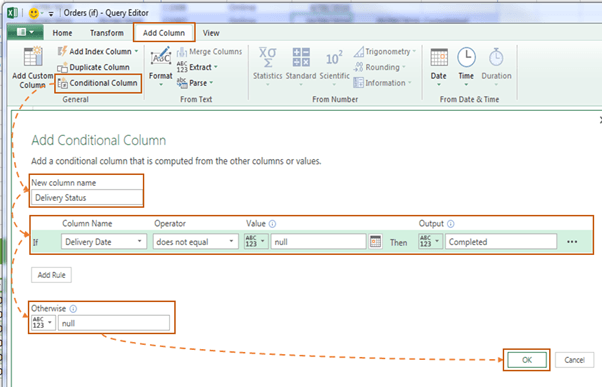
Notice
how you can read the ‘if’ line in the dialog box and it actually makes sense in English?
Digression: Maybe one day Excel formulas will catch up and we’ll be blessed with a similar dialog box.
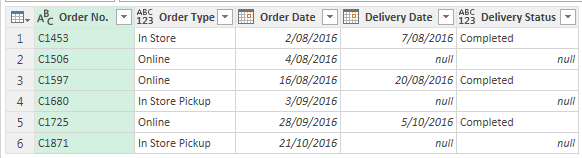
And we’re back; after clicking ‘OK’ we now have a new column for the Delivery Status:
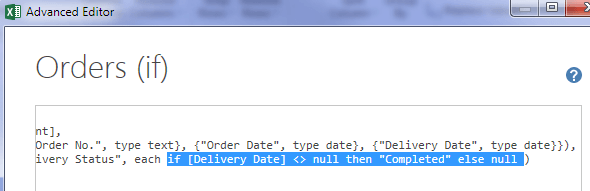
If you inspect the M code in the Advanced Editor you can see the
formula below has been written for you (highlighted in blue):
So, you can see that a regular Power Query if statement is dead easy to create with the Conditional Column GUI.
Unfortunately you can’t use the Conditional Column for every ‘if’ scenario. Sometimes you’ll have to use the Add Custom Column dialog box (see next example) and write them yourself. In which case you should be aware of the key differences to
the Excel IF Statement, namely:
- The ‘if’ in Power Query is lower case
- Instead of commas separating the value_if_true and value_if_false arguments we have the words then and else (in lower case).
- null means blank in Power Query
- Power Query formulas are case sensitive
Power Query if or Statements
Did you notice that the example above doesn’t allow for customers who come into the store and collect their own orders? These are the ‘In Store Pickup’ order types.
So what we actually need here is an IF OR statement.
The logic in English
is: if the delivery date column is not blank OR the Order Type is ‘In Store Pickup’, then the order has been Completed.
Unfortunately there isn’t a nice GUI to help us write the ‘if or’ statement so in this case we use the Add Column tab > Add Custom Column button:
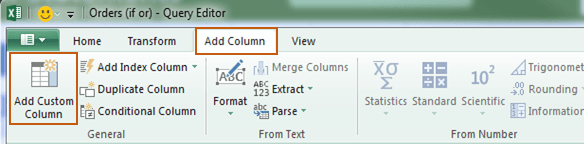
The dialog box opens and you have to give your column a name and then type your formula into the ‘Custom column formula:’
field:
Let’s look at the formula
more closely:
if [Delivery Date] <> null or [Order Type] = "In Store Pickup" then "Completed" else null
In English the above formula reads:
If the Delivery Date is not blank or the Order Type is ‘In store Pickup’ then return ‘Completed’ otherwise leave the cell blank
Each logical test is separated by ‘or’. Nice and easy, eh!
Power Query if and Statements
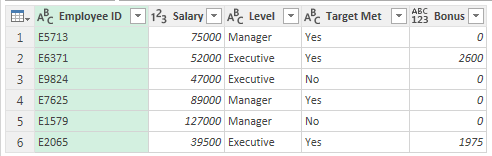
Power
Query ‘if and’ statements are equally easy. Let’s look at an example using some employee salary data shown below:
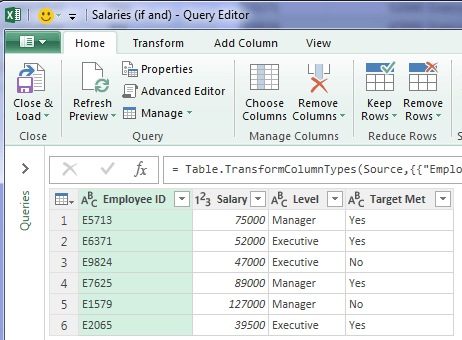
We want to add a column to calculate bonuses for the Executive level employees.
The logic in English is: if the Level is Executive AND the Target Met is Yes, then calculate the bonus as Salary x 5%, otherwise zero bonus.
As with the ‘if or’ statement, we have to use the Add Column > Add Custom Column dialog box to write this formula:
if [Level] = "Executive" and [Target Met] = "Yes" then [Salary] * .05 else 0
And you can see the results in the Bonus column below:
Holdup, what about bonuses for the Managers? Actually, the managers get 10% bonus if they meet their targets.
We can accommodate two levels of bonus using a nested if statement.
Power Query Nested if Statements
Using the same sample data our logic in English reads: if the Level is Executive AND the Target Met is Yes, then calculate the bonus as Salary x 5%, otherwise if the Level is Manager AND the Target Met is Yes, then calculate the
bonus as Salary x 10%, otherwise zero bonus.
And the formula is:
if [Level] = "Executive" and [Target Met] = "Yes" then [Salary]*.05 else
if [Level] = "Manager" and [Target Met] = "Yes" then [Salary]*.10 else 0
The key is to put the next ‘if’ statement after the first ‘else’. I’ve wrapped the formula onto two lines so it’s easier to see the nesting. You can continue nesting ‘ifs’ after each ‘else’.
More Power Query
Get started with our Introduction to Power Query tutorial.
Click here for more Power Query tutorials on our
blog.
And if you want to get up to speed quickly please check out my Power Query course.


 Check Out Our Courses